 |
    
|
|
|
Newly Added Knit Patterns
- Cotton Fashions for Crochet and Knitting | Book No. 38 | The Spool Cotton Company
- Knit Bedspread Pattern #6130
- Pullover Sweater Pattern 5908
- Pullover Sweater Pattern | Sizes 8, 10, 12, 14
- Lion Toy Pattern
- Knitted Edging on Luncheon Set Pattern #S-270
- Knitted Shirt and Soaker Set Pattern #5167
- Chanel Jacket Pattern
- Knitted Bathing Suit Pattern #601
- Knitted Suspender Skirt, Sweater and Jibber Pattern
- Ladies' Anklets Pattern #115
- Man's Sleeveless Sweater Pattern #2124
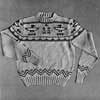
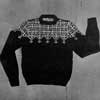
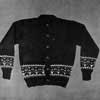
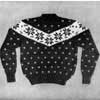
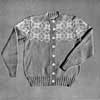
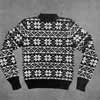
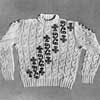
Playtime Sweaters for Children, Nomis Volume 21
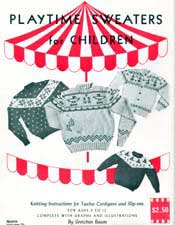
Playtime Sweaters for Children
Volume 21
Nomis Yarn Company
Original Copyright 1948
| ENTIRE DIGITALLY RESTORED LEAFLET IN .pdf FORMAT AVAILABLE FOR PURCHASE |
 |
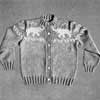
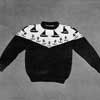
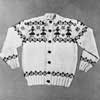
Twelve great sweater patterns for children. Each cardigan diagram is drawn so that a pullover sweater can be made from the pattern. Many size changes are possible with just a change in type of yarn and size of needles. The designs in numbers 1, 2, 3, 4, 6, 8 and 10 are especially easy for beginners in this type of knitting. In selecting color combinations, be sure to choose colors which are intense enough to give the amount of contrast necessary to show the design up well.
FOLLOWING DIRECTIONS
Except for the ribbing and the front bands on the cardigan sweaters, these sweaters are worked in the stockinette stitch (knit 1 row, purl 1 row). On the diagrams, each square marked with an x or o means a stitch of the color which these symbols represent. On the knit rows, follow the diagram from right to left; on the purl rows, from left to right. To have the patterns match correctly, it is necessary to follow the diagrams exactly for increases and decreases. The length of the back, front, and sleeve can be changed by adding or subtracting an even number of rows just after the ribbing. When directions are given in inches and do not show the exact number of rows, count rows so that corresponding pieces will be exactly alike. Be sure to note the exact number of stitches that are bound off for shoulders as the stitches may vary for each decrease.
GAUGE
Always determine the gauge of your knitting. To do this, work a small piece in the stockinette stitch using size needles and yarn given for garment you are to make, and compare it with the gauge given for each sweater. If you knit tightly, use a size larger needle; and if loosely, a size smaller needle. To determine the exact size a sweater will be, divide the number of stitches at the widest part of the pattern by the number of stitches per inch. This will give a measurement in inches.
WORKING WITH TWO OR MORE COLORS
To start a new color, do not tie on yarn, but leave an end about 5 inches long at the back of the work. These ends are fastened on the wrong side with a sewing needle and can be done when the work is finished. Always carry along loosely the yarn not being used by twisting it every 4th stitch around the yarn being used. This prevents large loops of yarn on the wrong side. The most important point in obtaining good results when knitting with more than one color is to carry the yarn loosely. Break the yarn only when through using that color. Sometimes tying on a second ball of the design color saves carrying the yarn from one side to the other when there is a large plain space in between. If one antici¬pates at which end of the work a color will next be used, much unnecessary carrying of the yarn can be avoided. If the design colors are rolled in balls so that the yarn comes from the inside, the yarns will not get tangled. Bobbins for this purpose can also be used.
CASTING ON AND BINDING OFF
If the larger needle is used for binding off the neckband and casting on for the sleeve, neither the neck nor wrist openings will be too tight.
ASSEMBLING SWEATERS
After all loose ends have been fastened on the wrong side, block each piece separately by pinning it face down on an ironing board with common pins, covering with a damp cloth, and pressing lightly with a moderately hot iron until the work is smooth. Then place right sides together and sew shoulder seams together with a running backstitch. Use a single strand of yarn for all sewing. Next, pick up stitches around the neck and knit in the neckband. Sew in the sleeves with the backstitch and press the seams with a damp cloth from the right side. Then sew the underarm and sleeve seams with an overhand stitch. Be sure to match patterns exactly when sewing seams and not to take in too much of the knitting for the seams. Finally, press all seams flat from the right side using a damp cloth, and block the completely assembled sweater once more. Sew buttons on front band of cardigan sweaters.
SIZE AND STYLE CHANGES
Because these patterns are planned stitch by stitch, when size changes are desired, it is better to change the size of the needles and/or the type of yarn than to add or substract stitches. Any of these sweaters can be made smaller by using a size smaller needle, and larger, by using a size larger needle with the type of yarn given. They can also be made smaller with finer yarn, and larger, with heavier yarn. When making changes, follow the pattern as to rows and stitches, not inches, the 4 waist and cuff ribbings being of lengths proportionate to the rest of the sweater. When directions are given in inches only, change them proportionately also. When making any size changes, check your own gauge to determine the exact size which will result.
Pullover sweaters can easily be made from all cardigans by repeating the back, changing it only for the neck opening as shown.
Knitting Patterns
With size 2 needles and the main color, cast on 76 stitches. Work in ribbing of knit 2, purl 2, for 1½ inches. Change to size 3 needles and knit across the next row, increasing to 77 stitches. Purl back, then work in stockinette stitch (knit 1 row, purl 1 row) until piece measures 9 inches, ending with a purl row. The design and underarm decreases are started on the next row. (More)
With size 2 needles and the main color, cast on 80 stitches and work in ribbing of knit 2, purl 2, for 1¾ inches. Change to size 3 needles and knit across the next row, increasing to 83 stitches. Purl back, then work in stockinette stitch (knit 1 row, purl 1 row) until piece measures 8½ inches, ending with a purl row. Follow the diagram for the contrasting yoke which starts on the next row. (More)

With size 2 needles and the main color, cast on 80 stitches. Work in ribbing of knit 2, purl 2, for 1¾ inches. Change to size 3 needles and knit across the next row, increasing to 83 stitches. Purl back, then work in stockinette stitch (knit 1 row, purl 1 row) until piece measures 9½ inches, ending with a purl row. Follow the diagram for the underarm decreases which start on the next row. Do not knit in design on back. (More)
With size 3 needles and the main color, cast on 68 stitches. Work in ribbing of knit 2, purl 2, for I¾ inches. Change to size 5 needles and knit the first row shown on the diagram, increasing to 69 stitches on this row. Purl back, then continue following the diagram in the stockinette stitch (knit 1 row, purl 1 row). Decreases for the underarm are made by binding off the number of stitches shown. (More)
With size 2 needles and the main color, cast on 88 stitches. Work in ribbing of knit 2, purl 2, for 2 inches. Change to size 3 needles and knit the first row shown on the diagram, increasing to 91 stitches on this row. Purl back, then continue, following the diagram for the design in the stockinette stitch (knit 1 row, purl 1 row), then continue until the piece measures 10½ inches, ending with a purl row. The design and underarm decreases are started on the next row. (More)

With size 2 needles and the main color, cast on 92 stitches. Work in ribbing of knit 2, purl 2, for 2 inches. Change to size 3 needles and knit the first row shown on the diagram, increasing to 95 stitches on this row. Purl back, then continue following the diagram in the stockinette stitch (knit 1 row, purl 1 row). Decreases made for the underarm are made by binding off the number of stitches shown. (More)
With size 2 needles and the main color, cast on 96 stitches and work in ribbing of knit 2, purl 2, for 2½ inches. Change to size 3 needles and knit across the next row, increasing to 101 stitches (increase about every 19th stitch). Purl back, then work in stockinette stitch (knit 1 row, purl 1 row) until piece measures 11 inches, ending with a purl row. Now follow the diagram, starting the first underarm decrease on the next row. (More)
With size 3 needles and the main color, cast on 76 stitches. Work in ribbing of knit 2, purl 2, for 2 inches. Change to size 5 needles and knit the first row shown on the diagram, increasing to 77 stitches on this row. Purl back, then continue, following the diagram in the stockinette stitch (knit 1 row, purl 1 row). When piece measures 11½ inches, ending with a purl row, bind off 4 stitches at the beginning of the next 2 rows for underarm. (More)
With size 2 needles and the main color, cast on 84 stitches. Work in ribbing of knit 2, purl 2, for 2½ inches. Change to size 5 needles and knit the first row shown on the diagram, increasing to 85 stitches on this row. Purl back, then continue, following the diagram in the stockinette stitch (knit 1 row, purl 1 row). Between the stripes marked on the diagram, white becomes the background color, and the blue becomes the design color. (More)
With size 2 needles and the main color, cast on 100 stitches. Work in ribbing of knit 2, purl 2, for 2½ inches. Change to size 3 needles and knit across the next row, increasing to 105 stitches (increase about every 20th stitch). Purl back, then work in stockinette stitch (knit 1 row, purl 1 row) until piece measures 12 inches, ending with a purl row. The design and underarm decreases are started on the next row. (More)
With size 2 needles and the main color, cast on 108 stitches. Work in ribbing of knit 2, purl 2, for 2½ inches. Change to size 3 needles and knit the first row shown on the diagram, increasing to 113 stitches on this row (increase about every 21st stitch). Purl back, then continue, following the diagram in the stockinette stitch (knit 1 row, purl 1 row). Decreases at the underarm are made by binding off the number of stitches shown. (More)
With size 2 needles and the main color, cast on 96 stitches. Work in ribbing of knit 2, purl 2, for 2½ inches. Change to size 4 needles and knit the next row, increasing to 99 stitches on this row. The next row is the first one shown on the diagram and is worked as follows: knit 1, *purl 9, knit 2, and repeat from * across row, ending with knit 1 instead of knit 2. The second row of the diagram is worked as follows: purl 1, * knit 9, purl 2, and repeat from * across row, ending with purl 1. (More)
| Pattern Categories Browse the categories to help you find the patterns you're looking for. |
||
|
||


