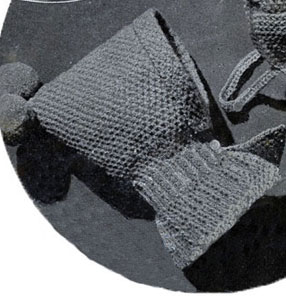
Baby Bonnet Pattern #5243

MATERIALS:
CHADWICK'S RED HEART BABY POMPADOUR, 2 balls (¾ oz. balls).
Clark's O.N.T. Knitting Pins, 1 pair No. 1 and 1 pair No. 2.
2 buttons.
GAUGE: 8 sts make 1 inch; 11 rows make 1 inch.
Starting at lower edge of one side with No. 2 needles, cast on 56 sts, 1st and 2nd rows: * K 1, p 1. Repeat from * across. 3rd and 4th rows: * P 1, k 1. Repeat from * across. These 4 rows constitute the pattern. Work in pattern until piece measures ¾ inch. Keeping continuity of pattern, dec 1 st at front edge on next row and every other row thereafter until 48 sts remain. Change to No. 1 needles and work tightly in ribbing of k 2, p 2, for ¼ inch. Then, starting at front edge, work across 2 sts, bind off 2 sts, finish row. On next row, cast on 2 sts to replace those bound off, thus completing a buttonhole. When ribbing measures ¾ inch, make another buttonhole in line with the first buttonhole. Continue until ribbing measures 1 inch in all, ending at front edge. Cast on 8 sts for front overlap.
Change to No. 2 needles and work as follows: 1st row: (K 1, p 1) 3 times; p 2, complete row in pattern. 2nd row: Work in pattern across to last 8 sts, k (k 1, p 1) 3 times. 3rd row: (P 1, k 1) 3 times; p 2, complete row in pattern. 4th row: Work in pattern across to last 8 sts, k 2, (p 1, k 1) 3 times. Repeat these 4 rows until piece measures 11 inches from last row of ribbing, ending at front edge. Starting at front edge, bind off 8 sts (front overlap complete). Change to No. 1 needles and work 1 inch of ribbing. Change to No. 2 needles; and work in pattern, increasing 1 st at front edge on every other row until there are 56 sts on needle. Work straight for ¾ inch. Bind off in pattern.
FINISHING … Sew up back seam. Sew on buttons to correspond with buttonholes. Fold back front overlap and steam hood through damp cloth.
POMPON … Cut 2 circles of cardboard each 2 inches in diameter. Then cut a circle 1 inch in diameter at center of each cardboard circle. Divide remaining yarn into 2 equal parts (1 part for each pompon). Cut a ½-yard length from 1 part and lay aside. Fold remainder of this part into 3-yard lengths. Place cardboard circles together and wind yarn around the double circles, drawing yarn through center opening and over edge, then through center opening again. Continue to do this until yarn is all used up and cardboard circle is covered. With a razor or a very sharp scissors, cut yarn all around along outer edge between the 2 cardboard circles. Double the ½-yard length which was laid aside, slip it between the 2 cardboards and tie it securely around the strands between cardboard circles. Remove cardboards and trim pompon evenly. Make another pompon same as this. Sew pompons on hood as in illustration, or to suit individual taste.
Sacque No. 5240 Pattern
Soakers No. 5252 Pattern
Bonnet No. 5245 Pattern
Bonnet No. 5243 Pattern
Mittens No. 5248 Pattern
Mittens No. 5247 Pattern
Baby Outfit No. 5253 Pattern
Baby Outfit No. 5254 Pattern
Baby Blanket No. 5228 Pattern
Baby Leggings No. 5231 Pattern
Baby Cardigan No. 5233 Pattern
Baby Cardigan No. 5232 Pattern
Baby Sweater No. 5236 Pattern
Baby Sweater No. 5235 Pattern
Jack & Jill Jumpers No. 5246 Pattern
Baby Set No. 5250 Pattern
Baby Sweater No. 5237 Pattern
Bonnet No. 5244 Pattern
Bonnet No. 5241 Pattern
Sacque No. 5239 Pattern
Bottle Cover, Mittens & Bootees No. 5249 Pattern
Baby Set No. 5238 Pattern
Soakers No. 5251 Pattern
Bonnet No. 5242 Pattern
Carriage Cover No. 5229 Pattern
Baby Blanket No. 5227 Pattern
Bunting No. 5230 Pattern
Baby Cardigan No. 5234 Pattern
| Pattern Categories Browse the categories to help you find the patterns you're looking for. |
||
|
||


