 |
    
|
|
|
Newly Added Knit Patterns
- Cotton Fashions for Crochet and Knitting | Book No. 38 | The Spool Cotton Company
- Knit Bedspread Pattern #6130
- Pullover Sweater Pattern 5908
- Pullover Sweater Pattern | Sizes 8, 10, 12, 14
- Lion Toy Pattern
- Knitted Edging on Luncheon Set Pattern #S-270
- Knitted Shirt and Soaker Set Pattern #5167
- Chanel Jacket Pattern
- Knitted Bathing Suit Pattern #601
- Knitted Suspender Skirt, Sweater and Jibber Pattern
- Ladies' Anklets Pattern #115
- Man's Sleeveless Sweater Pattern #2124
Hand Knit Fashions | Bernhard Ulmann Company | Volume 341

Hand Knit Fashions
Volume No. 341
Bernhard Ulmann Company
Original Copyright 1950
| ENTIRE DIGITALLY RESTORED LEAFLET IN .pdf FORMAT AVAILABLE FOR PURCHASE |
 |
HELPFUL INFORMATION
ACTUAL BODY MEASUREMENTS
| Size | 12 |
14 |
16 |
18 |
20 |
Bust |
30 ins. |
32 ins. |
34 ins. |
36 ins. |
38 ins. |
Waist |
25 ins |
26½ ins. |
28 ins. |
30 ins. |
32 ins. |
Hip (7 ins. below waist) |
33 ins. |
35 ins. |
37 ins. |
39 ins. |
41 ins. |
MEASUREMENTS OF GARMENTS—The sizes of garments in this book are based on the actual body measurements given above. An allowance has been made over the body measurements to give sufficient ease and insure correct fit. This allowance varies according to the style of garments, stitch, type of yarn and gauge of knitting.
TO CHANGE SIZE OF GARMENTS TO ANOTHER REGULATION SIZE—Add (or subtract) the number of sts equal to 1 inch to both back and front of garment for each size larger (or smaller) than the size given in the instructions. In a pattern stitch, add (or subtract) the number of sts given for 1 or more repeats (or multiples) of pattern. For cardigans or jackets, add (or subtract) ½ inch to each front. Width across back and front at shoulders varies ½ inch for each size. Decrease more (or less) sts in shaping armholes, if necessary to obtain desired width at shoulders. Sleeve width varies ½ inch around upper arm and ¼ inch at wrist for each size. Armholes vary ¼ inch in depth. Any change in length of body or sleeves should be made by adding to (or subtracting from) the length between lower edge and underarm (below waistline on fitted garments).
IF YOU VARY FROM A REGULATION SIZE—Take your own measurements wherever you differ from the size given in the instructions. Multiply the number of inches of each of these measurements by the number of stitches (or rows) equivalent to 1 inch. In this way you get the number of stitches (or rows) required at each particular place where it is necessary to make your garment larger or smaller. Follow instructions given, changing number of decreases or increases to obtain desired width or changing the number of rows between decreases or increases to obtain the desired length.
CHECK YOUR GAUGE—It is very important to obtain the correct gauge given in instructions. To check your gauge, cast on enough stitches for a 4-inch sample. Knit about 4 inches. Measure off 2 inches in the center of this sample and mark with pins. Count the stitches between pins.
If you have less stitches than required for 2 inches, your knitting is too loose, try a smaller size needle. If you have more stitches than required for 2 inches, your knitting is too tight, try a larger size needle. Always cast on loosely for ribbing and when working with Super-Spun Nylon.
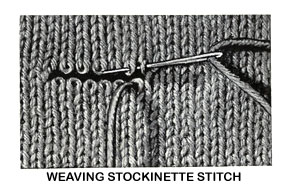
WEAVING STOCKINETTE STITCH NOT ON NEEDLES—Thread a tapestry needle. Hold edges to be joined close together. Draw up yarn in first st on upper piece, inserting needle from wrong side; insert needle from right side in first st on lower piece and bring up through next st from wrong side—draw up yarn; * insert needle from right side in same st as before on upper piece and bring up through next st from wrong side—draw up yarn; insert needle from right side in same st as before on lower piece and bring up through next st—draw up yarn; repeat from * until all sts are joined; fasten off.

BLOCKING OR STEAMING
TO BLOCK CAPRICE OR TRICOLAINE WAISTS OR JACKETS—Block each piece separately as follows: Lay piece flat on pressing board, wrong side up, pin edges to board, if necessary. If your knitting worked on a slant, run a thread down center of each piece; pin to board with thread at center in a straight line. Steam well with moderately hot iron over a wet cloth taking care not to let weight of iron rest upon any one spot. (Do not block ribbed cuffs, waistband or neckband). Leave pinned until thoroughly dry.
TO BLOCK CAPRICE OR TRICOLAINE SKIRTS—Pin to board as above and block. When thoroughly dry, remove from board. Pin and block other half. Steam out creases.
TO BLOCK GARMENTS OF ANY OTHER BEAR BRAND YARN—Pin to pressing board and steam as above.
TO BLOCK PATTERN STITCHES—Pattern or Ribbed Stitches hold garment in to a much narrower width than specified. When blocking such stitches, use enough pressure on iron so that garment will retain desired measurements.
TO STEAM FINISHED ARTICLE—Lay flat on pressing board, wrong side out. Steam first one side and when dry, steam on other side, following instructions above. Pin one-piece dress across waistline. Steam all seams and folds on wrong side.
FINISHING
FINISH WAISTS, BLOUSES, SWEATERS, JACKETS, ETC., AS FOLLOWS:
Sew side, shoulder and sleeve seams, matching stripes or pattern where necessary. Sew in sleeves with sleeve seam at center underarm, easing in any extra fullness at top. Run in all ends of yarn on wrong side, either along seam or along line of 1 row of knitting.
If there are facings, sew on facings with wrong side of facing to wrong side of garment.
If garment has hems, turn up and sew to wrong side.
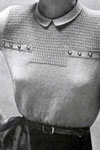
If garment has a collar, sew on collar with center back of collar at center back of neck.
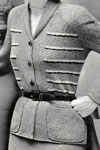
If there are patch pockets, pin pockets at desired points (or as illustrated) and sew.
If there are pocket linings, sew side and lower edges of lining to wrong side of garment.
If there are separate cuffs, sew on as illustrated.
Finish all free edges (with exception of ribbing, facings or hems) with 1 or 2 rows of sc (work first sc row from right side), spacing sts to keep an even edge and increasing at corners.
Finish back or front neck openings with 1 row sc if you wish to use a slide fastener. Sew in fastener. Finish with 2 rows sc, working required number of buttonloops on 2nd row, if you wish to use buttons. Sew on buttons.
Overcast buttonholes, or finish in blanket stitch and sew on buttons.
Sew in shoulder pads.
Sew ribbon on wrong side of fitted jackets at waistline if desired.
Sew seam binding on wrong side across shoulder seams if desired.
After all finishing is completed, steam seams and edges.
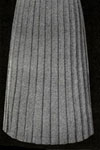
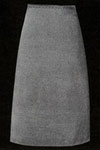
SKIRTS—Work 2 rows sc on lower edge of Straight Skirt. Work 1 row sc on lower edge of Ribbed Skirts.
CASING FOR ELASTIC FOR SKIRTS—Holding wrong side of skirt toward you, join yarn on top edge of skirt, ch 5, skip 1 st, 1 slip st in next st at left in 6th row below, ch 5, skip 1 st, 1 slip at top of skirt in 4th st at left of first st, ch 5; continue in this way around top of skirt, joint with slip st in first st; ch 1, turn, 1 sc in each st around top of skirt; join. Fasten off. Insert elastic.
BEADING FOR ELASTIC FOR SKIRTS—Holding right side of skirt toward you, join yarn on top edge of skirt, ch 5, skip 1 st, 1 tr in next st, ch 1, skip 1 st, 1 tr in next st; continue in this way around top of skirt, join with slip st in top of ch; ch 1, do not turn, 1 sc in each st around top of skirt; join. Fasten off. Insert elastic.
Finish One Piece Dresses as Above. Sew waist to skirt, easing in any extra fullness of waist. If waist has front opening, lap right front edge over left front edge.
CASING FOR ELASTIC FOR ONE-PIECE DRESS—Work as for casing for skirts, see above, beginning in 3rd round above center of waistline and working next slip in 3rd round below waistline, omitting the sc row on top of skirt, insert elastic.
 |
 |
 |
 |
 |
 |
 |
 |
 |
 |
 |
 |
 |
 |
 |
 |
 |
 |
 |
 |
 |


| Pattern Categories Browse the categories to help you find the patterns you're looking for. |
||
|
||


